Yeoman入門(第二部、generatorを作る)
さて、Yeoman入門の第二部です。このエントリはシリーズ物なので、第一部を見ていない方は第一部も参考にしてください。
Yeoman入門(第一部、yoを使う) - from scratch
第一部を軽くおさらいすると、yoは雛形作成をしてくれるツールでした。
そのyoの雛形作成機能を使えば、手間を掛けずに基盤が作れるという利点がある、という説明をしました。
今回の話は、そのyoの雛形を作成する方法を紹介します。
ここではその雛形を作成する機能のことを generator と呼びます。
generatorを作る。
既存のgeneratorを参考にして作る方法とgenerator-boilerplateを使う方法、generator-generatorを使う方法の3種類があります。ただ、どれも仕組みは同じなので全ては説明しません、generator-generatorを使う方法を中心に説明します。
その前にgeneratorの仕様を確認
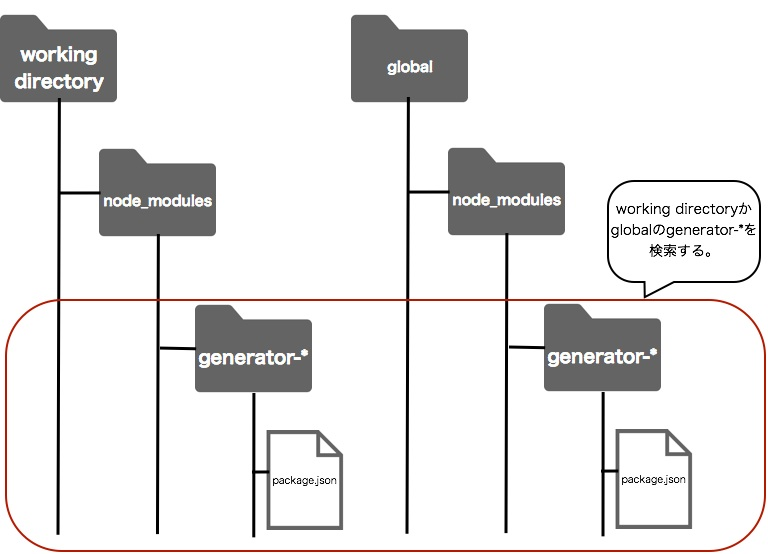
yoは自分のローカルにあるnode_modulesフォルダとglobalにあるnode_modulesフォルダを検索し、"generator-"から始まるフォルダであり、かつpackage.jsonがあるかどうかを見つけてgeneratorかどうかを判断します。

generator-generatorを使う。
generator-generatorを使うと、yeoman-generatorを作るための雛形が生成されます。
名前の通り、雛形の雛形ですね。
早速インストールして、作ってみましょう。
generator-generatorのインストール
$ npm install generator-generator -g
その後、yoで起動してgeneratorを作りますが、generatorはカレントディレクトリに作成されるので一旦新しいフォルダを作成してそこに作るようにしましょう。前述のとおり、generator-* という名前にする必要があります。ここではひとまず、generator-helloworldにしてみましょう。
$ mkdir generator-helloworld
$ cd generator-helloworld
作成したらgenerator-generatorを起動します。以下の様なコマンドを実行してください。
$ yo generator-generator
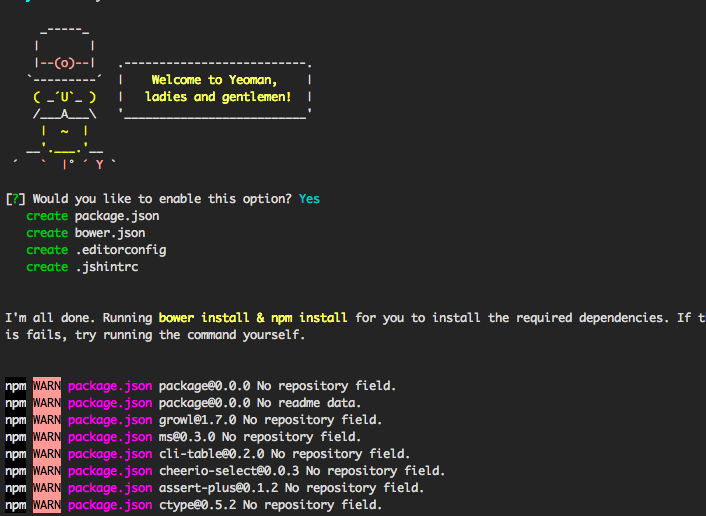
すると、以下の様なAAが出ますので、適当に回答してください。

作成後は以下の様な構成になっていることを確認してください。
generator-helloworld
├── LICENSE
├── README.md
├── app
│   ├── index.js
│   └── templates
│       ├── _bower.json
│       ├── _package.json
│       ├── editorconfig
│       ├── jshintrc
│       └── travis.yml
├── node_modules
│   ├── mocha
│   └── yeoman-generator
├── package.json
└── test
    ├── test-creation.js
    └── test-load.js
generator-helloworldの動作確認
ファイルが作成された後、一旦generator-helloworldの動作確認をしましょう。
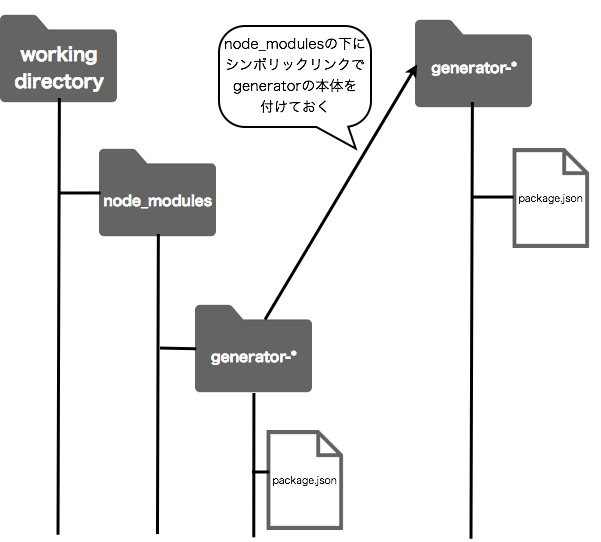
generatorの作り方を示しているyeomanのwikiでは npm linkを使って確認するのですが、globalフォルダにgeneratorが作成されてしまうので、パーミッションの問題や同名のファイルを作成できない等の問題があります。というわけでlocalに作るほうが色々と問題が少ないです。
雛形を作成するフォルダ(ここではhelloworld)を作成し、そこに以下の様な構成でフォルダを作ります。

さて、早速作ってみましょう。
$ mkdir helloworld
$ cd helloworld
$ mkdir node_modules
$ ln -s <generator-helloworldのパス> node_modules/.
作ったら早速 generator-helloworldを使ってみましょう。
$ yo helloworld

終了すると以下の様な構成になっていると思います。
├── .editorconfig
├── .jshintrc
├── app
│   └── templates
├── bower.json
├── node_modules
└── package.json
一旦これで雛形のファイル群が作成される事が確認できたと思います。
後はgenerator-helloworldを変更していく事で自分好みのカスタマイズを加えることができます。
generator-helloworldを変更してみる。
一旦generator-helloworldに戻って自分好みのカスタマイズを加えてみましょう。
APIの詳細に関しては次の第三部で詳しく説明するので、ここでは簡単にgenerator作りの雰囲気を見て覚えてください。
generator-helloworld/app/index.jsを開いてください。
index.js
'use strict';
var util = require('util');
var path = require('path');
var yeoman = require('yeoman-generator');


var HelloworldGenerator = module.exports = function HelloworldGenerator(args, options, config) {
  yeoman.generators.Base.apply(this, arguments);

  this.on('end', function () {
    this.installDependencies({ skipInstall: options['skip-install'] });
  });

  this.pkg = JSON.parse(this.readFileAsString(path.join(__dirname, '../package.json')));
};

util.inherits(HelloworldGenerator, yeoman.generators.Base);

HelloworldGenerator.prototype.askFor = function askFor() {
  var cb = this.async();

  // have Yeoman greet the user.
  console.log(this.yeoman);

  var prompts = [{
    type: 'confirm',
    name: 'someOption',
    message: 'Would you like to enable this option?',
    default: true
  }];

  this.prompt(prompts, function (props) {
    this.someOption = props.someOption;

    cb();
  }.bind(this));
};

HelloworldGenerator.prototype.app = function app() {
  this.mkdir('app');
  this.mkdir('app/templates');

  this.copy('_package.json', 'package.json');
  this.copy('_bower.json', 'bower.json');
};

HelloworldGenerator.prototype.projectfiles = function projectfiles() {
  this.copy('editorconfig', '.editorconfig');
  this.copy('jshintrc', '.jshintrc');
};
まずはpromptを追加してみましょう。
prompts変数に名前を聞くように追加してみましょう。
  var prompts = [{
    type: 'confirm',
    name: 'someOption',
    message: 'Would you like to enable this option?',
    default: true
  },
  {
    name: 'yourname',
    message: 'What is your name?',
    default: "someuser"
  },
  ];

  this.prompt(prompts, function (props) {
    this.someOption = props.someOption;
    this.yourname = props.yourname;
    cb();
  }.bind(this));
さて、名前を追加したらそれを表示するhtmlファイルとpackage.jsonのauthorに追加してみましょう。
まずはindex.htmlを作成し、templatesの下に置いてください。
index.html
<html>
  <body>
    <h1>Hello, <%= yourname %></h1>
  </body>
</html>
generator-helloworld
├── LICENSE
├── README.md
├── app
│   ├── index.js
│   └── templates
│       ├── index.html //NEW!!
│       ├── _bower.json
│       ├── _package.json
│       ├── editorconfig
│       ├── jshintrc
│       └── travis.yml
├── node_modules
│   ├── mocha
│   └── yeoman-generator
├── package.json
└── test
    ├── test-creation.js
    └── test-load.js
次にtemplates/_package.jsonを変更してみましょう。
{
  "name": "package",
  "version": "0.0.0",
  "dependencies": {},
  "author": "<%= yourname %>"
}
最後にapp/index.jsを以下のように変更しましょう。
HelloworldGenerator.prototype.app = function app() {
  this.mkdir('app');
  this.mkdir('app/templates');

  //copyからtemplateに変更する
  this.template('_package.json', 'package.json');
  this.copy('_bower.json', 'bower.json');
  // index.htmlのコピーを追加する
  this.template('index.html', 'index.html');
};
helloworldフォルダを再作成。
先程雛形を作成したフォルダを一旦削除し、もう一度シンボリックリンクを結ぶ構成を作ります。
$ rm -rf helloworld
$ mkdir helloworld
$ cd helloworld
$ mkdir node_modules
$ ln -s <generator-helloworldのパス> node_modules/.
その後、yoコマンドを再実行します。
$ yo helloworld

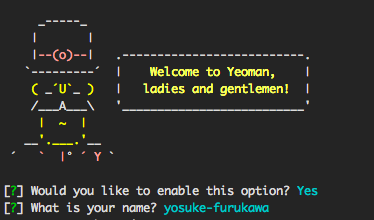
すると、promptが追加されていることがわかると思います。
さらにpromptに回答した後、index.htmlが作成されているので、内容を確認すると、promptで回答した名前が入っていることがわかると思います。
$ open index.html

このような形で対話を増やし、ファイルにyeoman実行中に取得した値を埋め込むことが可能です。
他にも色んな用途があるので、もう少し詳しい紹介は次の第三部で行います。
ちなみに、yeomania紹介
generatorの確認をする度に毎回シンボリックリンクを貼るフォルダ構成作るの面倒だなーと思ったので、 yeomania というツールを作りました。
使い方はシンプルで、
$ npm install yeomania -g
でインストールし、
$ mkdir yo_test
$ cd yo_test
$ yeomania create <generator_path> .
とすると、フォルダ構成が作成されます。
generatorを起動するとyo_testの中にファイルができるので、それをリセットする場合は、
$ yeomania recreate <generator_path> .
とすればリセットされます。頻繁に確認する場合は本ツールを使うか、特に複雑なことはしていないので、シェルスクリプト化して使いましょう。